


If you need to then add definition to your face to enhance your bone structure and facial features, contouring and highlighting is the method of doing this.
For beginners, contouring and highlighting techniques can definitely seem just a little overwhelming. After all, there are so many various ways in which you can perform this!
However, don’t worry, it doesn’t need to be difficult…
All you need to do is follow these nine steps for contouring and highlighting perfection!
What You’ll Need
Of course, before you can begin contouring and highlighting, you need to ensure that you possess the right products and tools.
Here is really a list of what you should have to follow these nine steps:
- A cleanser
- A moisturizer
- A primer
- Color correcting concealers, only if you have any skin discoloration or blemishes you need to hide
- A foundation that suits your skin tone
- A highlighting product, or perhaps a concealer or foundation, that is two shades lighter and brighter than the skin tone
- A contouring product, or perhaps a foundation or concealer that's two shades deeper than the skin tone
- A beauty sponge or blending brush
- A blush (optional but recommended)
- A setting spray or powder
Tempted to choose a product along with some shimmer?
Don’t be.
When you are first getting started with contouring and highlighting, you would like the ultimate lead to look as natural as you possibly can. Using a shimmery or glittery product will have the opposite effect.
Step 1: Prep Your Face
Before you can get began with the particular makeup products, you will need to first prep your face.
Begin by cleansing, making sure that you have carried out this thoroughly.
Then, contact a layer of moisturizer. Ideally, choose a moisturizer that doesn't leave a greasy residue behind, but that also nourishes and protects the skin.
Finish up with a primer, employing this all over your face.
Wondering if you can skip this prep step?
You can, however the results won’t be as flawless as they otherwise could have been.
Cleansing, moisturizing and priming gives you a clean, blank canvas to work from. It will give your makeup to glide seamlessly onto your skin, as well as make sure that all your effort can last for a lot longer.
Step 2: Color Correct
If you don’t have any blemishes or discoloration problems, this is a step that you can skip.
However, for anyone who isn’t quite so lucky, one correcting product is required for a perfect face.
These concealers are available in specific colors that can mask certain skin concerns.
For example:
- Green Color Correctors – these neutralize any redness on the face, whether these may be spots or larger patches
- Yellow Color Correctors – these are ideal for hiding brown spots and bruising, while also adding a warmth towards the skin
- Orange Color Correctors – these help to hide under eye circles and age spots, and may include a radiant glow to dull skin
- Pink Color Correctors – another one that's good for under-eye under eye circles, as well as any dark shadows round the mouth
- Purple Color Correctors – these are ideal for minimizing and yellow tones within the skin, helping to brighten the complexion
Those are just the main categories that color correctors can be found in…
Each color mentioned previously will feature color correctors in several different shades and intensities. The one you choose usually depends on your skin tone, as well as the severity of your skin concerns you are attempting to focus on. For this reason it's so vital that you try a number of different products before settling on the one which works well with you.
Ready to use your color corrector?
All you must do is use the product to the problem area after which blend this in well until your redness, dark spots and blemishes have disappeared.
Step 3: Foundation
While the prep stage, along with the color correcting stage, already helps you to provide you with a smoother and more even base to work from, you still have to apply a layer of foundation too.
This foundation should be inside a shade that suits the skin tone as perfectly as you possibly can.
Use a brush or a sponge to apply your foundation, blending it in well.
Do you've got a darker complexion?
Make certain you spend extra time blending your foundation halfway down your neck. This will give a much smoother transition involving the face and neck, helping your makeup to look more natural.
Can’t seem to find a foundation that suits your skin tone?
Here are a few guidelines to help you out:
- Swatches on the arm may look pretty on Instagram, however, you need to actually try foundation swatches out on your face to get the real effect of methods they match your skin tone. You need to go for the colour tone that disappears to your skin and can't be viewed
- Your skin tone changes through the year, and it is likely to be darker in the summertime. Complexion may also vary on different parts of the face area, so you may require more than one foundation shade to really achieve a flawless finish
- Test a basis in different light settings, taking lots of photographs along the way so that you can begin to see the full effect from the shade you are using
- If you’re still stuck, an expert color matching service may be that which you need
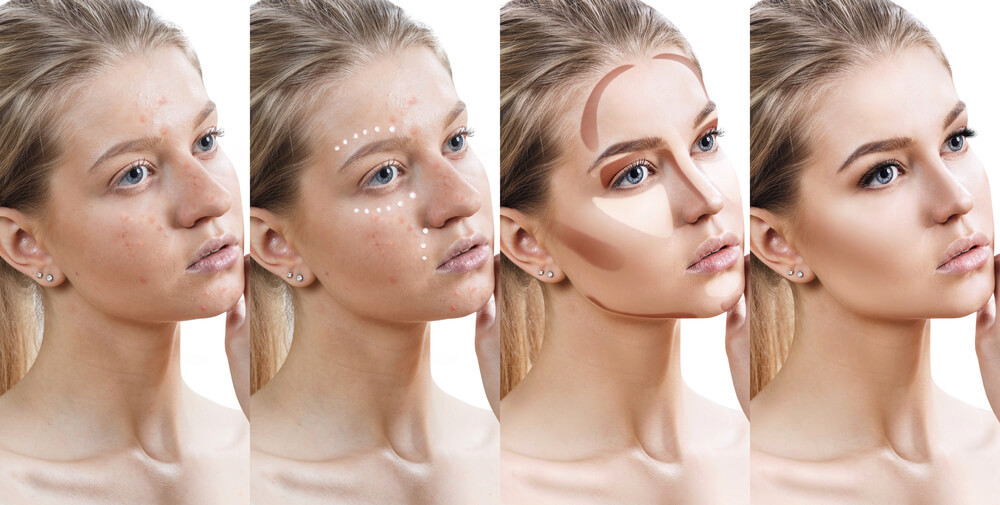
Step 4: Start Highlighting
You’re now ready to begin highlighting.
For this, you'll need the highlighting product that you have chosen, that ought to be two shades lighter than your skin tone.
These are the regions of the face to apply the highlighting product to:
- Across the forehead
- Down the bridge from the nose
- Across the chin
- Underneath your eyes
If you want to capture things further, then add highlighter to those areas as well:
- The inner corners of your eyes
- Underneath your eyebrow arch
- In involving the eyebrows
- Above your cheekbones
Basically, the highlighter needs to be put on all the places that the sun's rays naturally hits the face area. Fundamental essentials areas that naturally reflect light, and all you do is emphasizing this.
Step 5: Blend (Optional)
This step is an optional one.
You are most likely thinking…
What transpires with the streaks of highlighter on my small face basically don’t blend?
You will have the chance to blend them in afterwards, when you are done contouring. Although some people like to merge between highlighting and contouring, others save the blend for the end. Test out each method to understand which you want.
How should you blend?
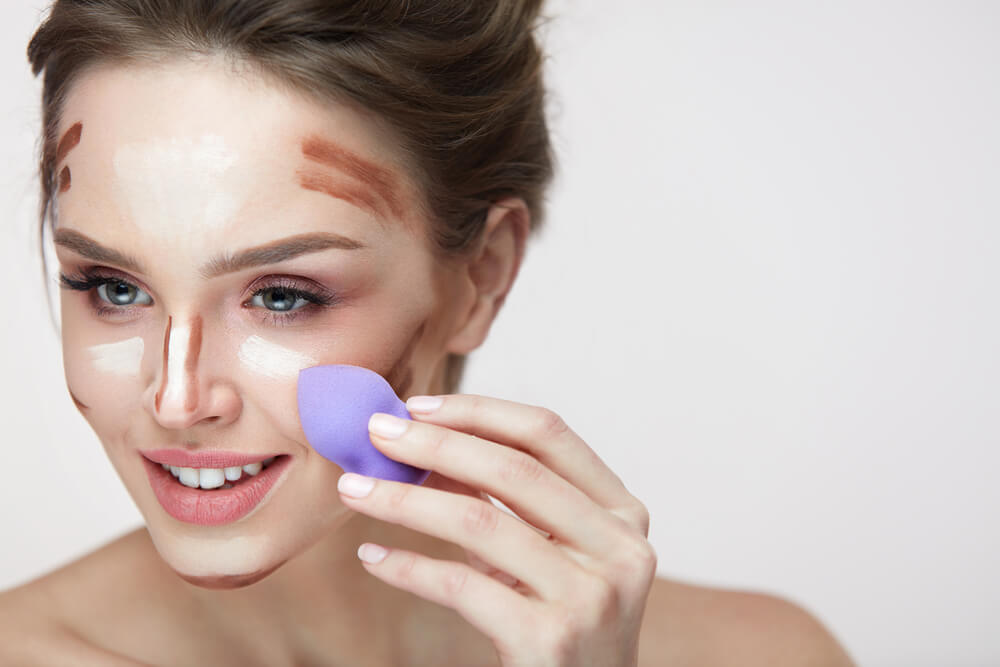
You can use a blending brush for this, although an elegance sponge is commonly easier. Simply pat at the skin with short and quick strokes, until the lines have become invisible.
Step 6: The Contouring
You can now begin countouring, so will need your contouring product, that ought to be two shades deeper than your skin tone.
All you need to do is apply the product to the following regions of your face:
- Around the hairline
- Underneath the cheekbones/ the hollows from the cheeks
- Along the jawline
- Down the center of the neck
Of course, that advice is very generalized…
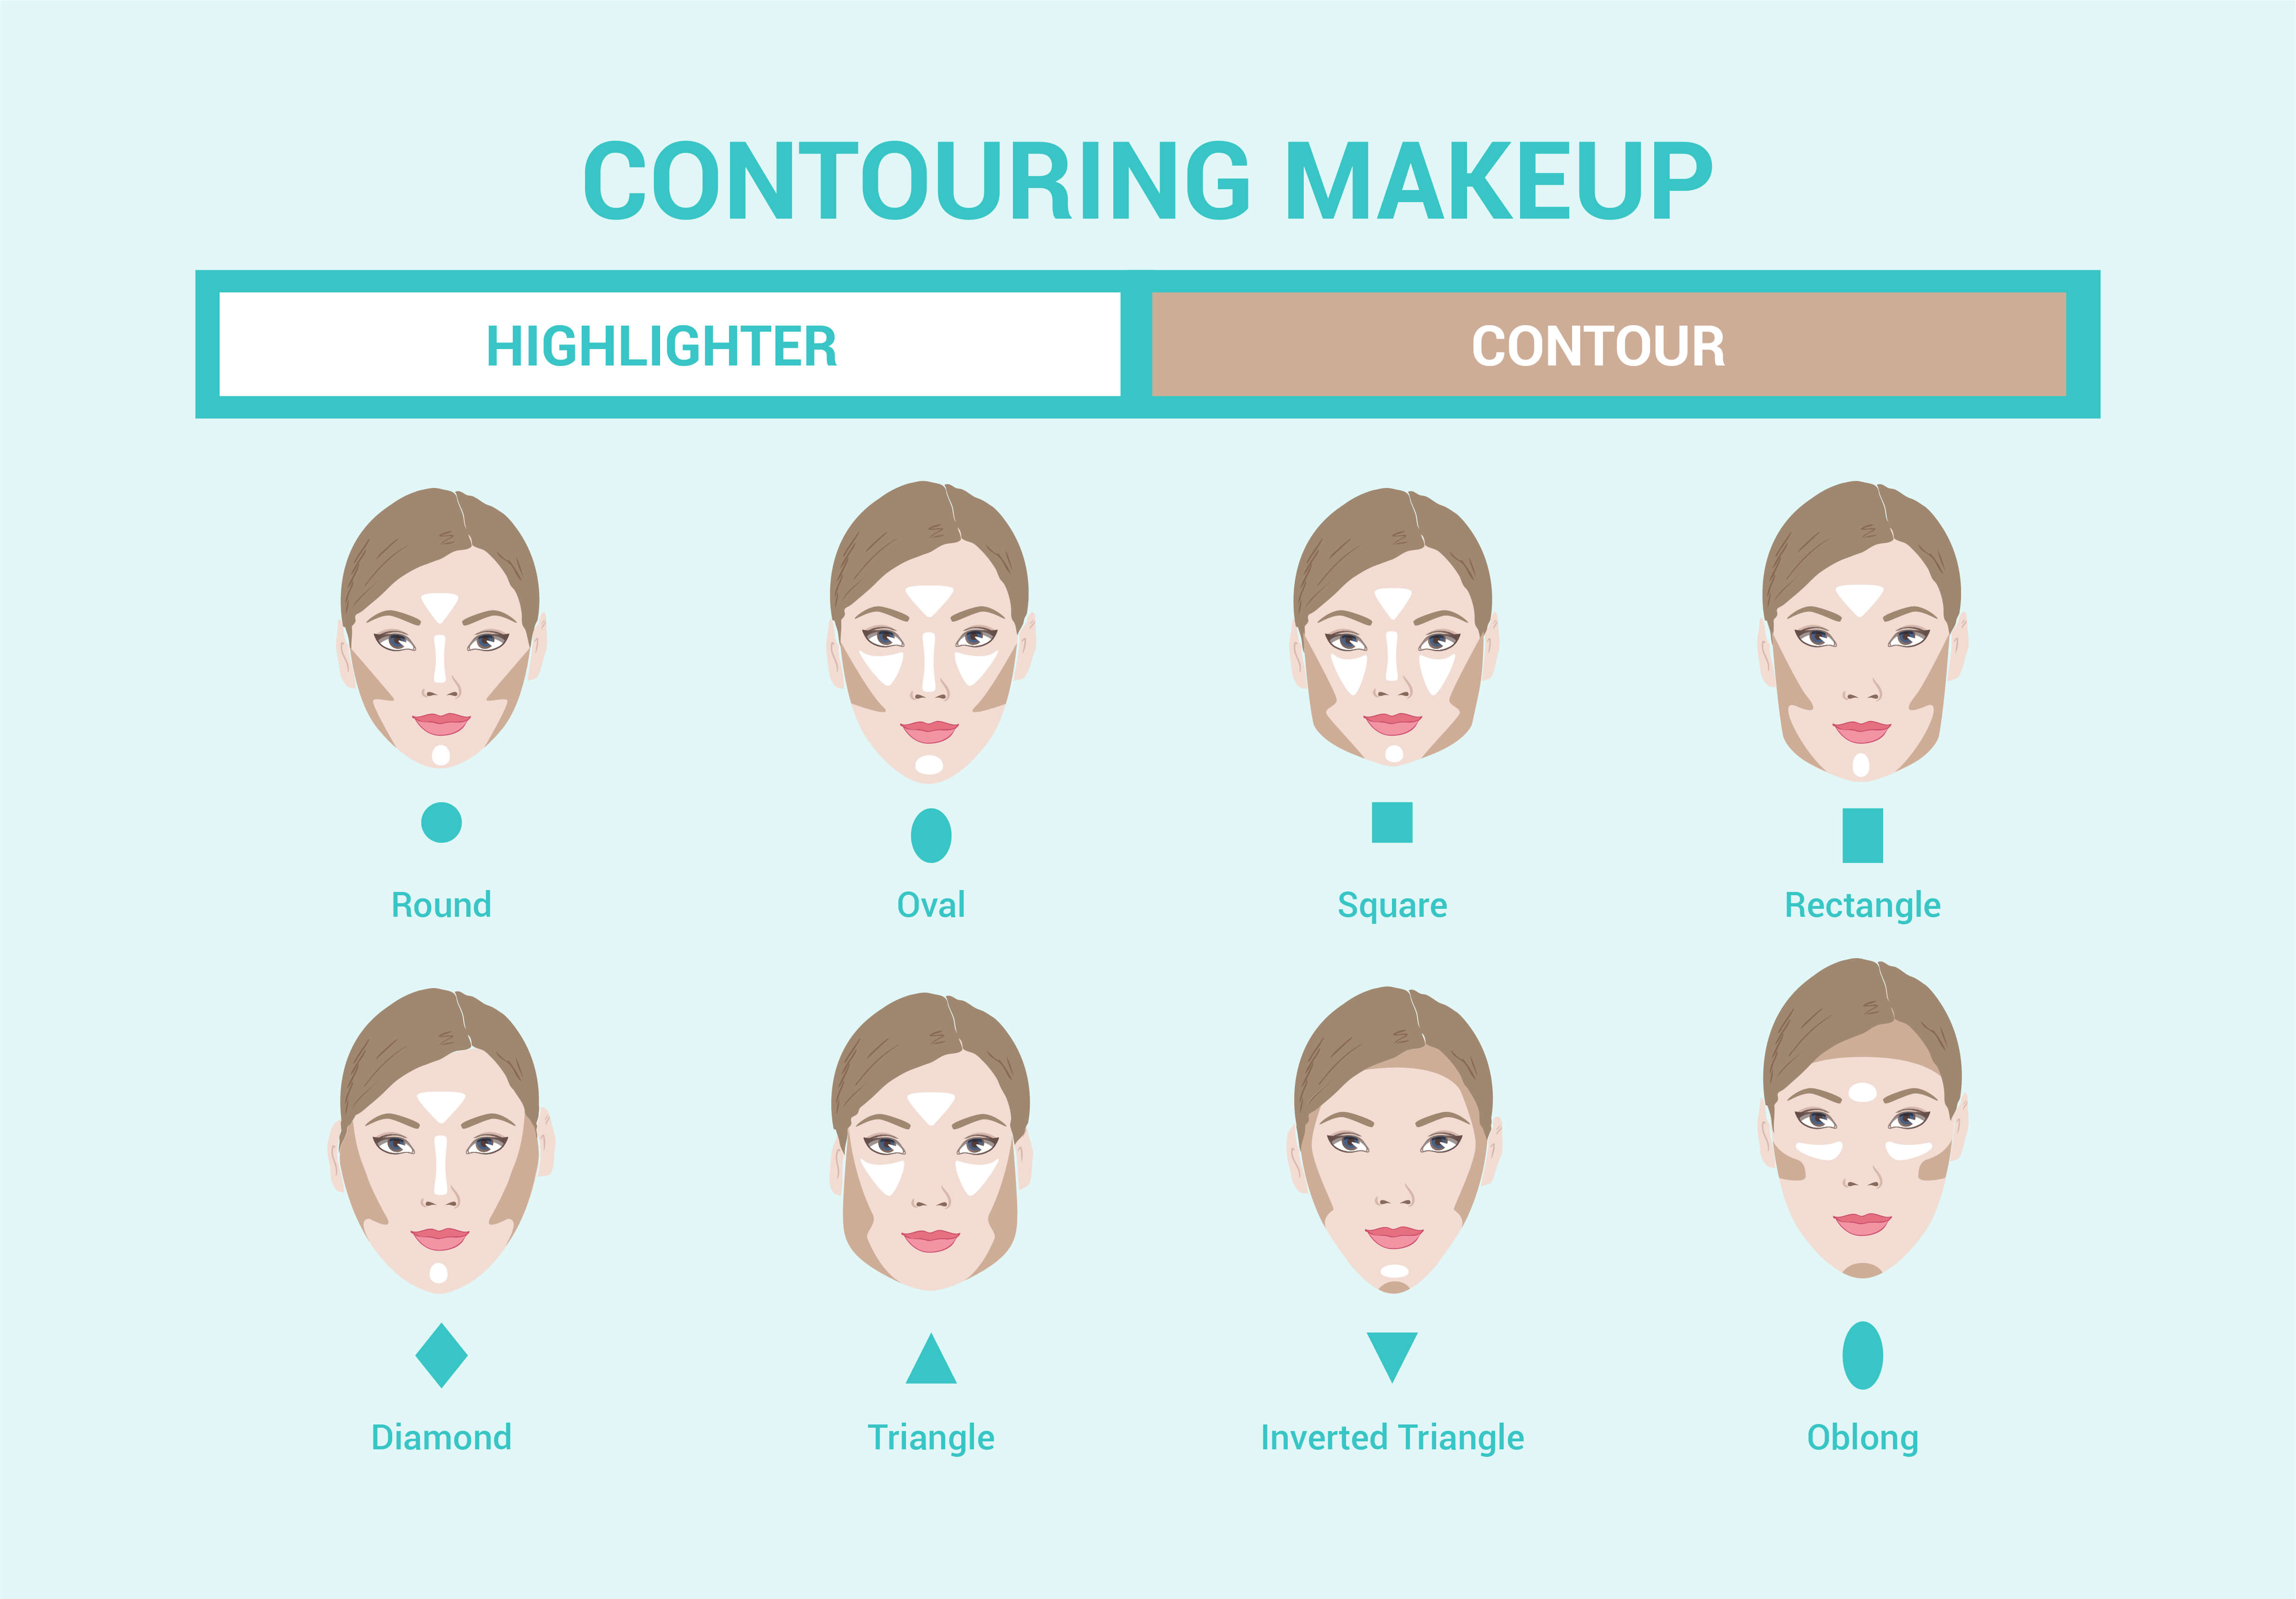
In order to perfectly contour your face, you need to also keep your face shape in mind:
- Square-shaped face – apply your countouring product towards the perimeter of the face, as this will help to soften up your angles
- Oval-shaped face – this is the ideal face shape, so that you can take more time contouring small details that you would like to emphasize
- Long face – contouring along your jawline and forehead will assist you to produce the illusion of the shorter face
- Round face – contouring alongside of your forehead, along with your temples, jawline and below the cheekbones, will give your face much more of an angular look
- Diamond-shaped face – pay extra attention to the sides of your face, as well as the center of the forehead, because this will assist you to elongate your face
- Heart-shaped face – give the underside 1 / 2 of the face more contouring, as this will help to round out the point of your chin
Step 7: Blend
Now comes the blending part again…
Follow the blending advice mentioned in Step 5, ensuring you fade away any harsh lines.
Step 8: The Blush (Optional)
Applying some blush for your face is yet another optional step, but is a step that is highly advised.
Why?
Because the blush helps to add a softer and more natural color to your face. It'll give your face even more dimension, while perfectly pulling together your entire look.
Convinced that you'd take advantage of some blush?
Well, much like together with your contouring product, the way in which are applying your brush should be according to the face shape.
Here are some guidelines:
- Square-shaped face – use your blush to cover your whole cheekbone, running it outwards to your hairline
- Oval-shaped face – focus on our cheekbones, using the blush outwards towards your earlobes and then up towards your temples
- Long face – focus on the apples of your cheeks, blending the blush towards onto your nose after which back out towards your temples
- Round face – smile, after which apply two swipes of blush towards the apples of your cheeks, blending this outwards instead of towards the nose (that will only help make your face appear rounder)
- Diamond-shaped face – focus your blush on top half of your cheekbones, as this will assist you to balance out your face shape
- Heart-shaped face – apply your blush in a “C” shape from the top of your temples down to your cheekbones, before diffusing it upwards
Of course, the colour of the blush is important too.
This ought to be chosen based on the skin tone:
- Fair Skin – baby pink and peach shades work nicely for you personally
- Medium Skin – try an apricot, mauve or soft berry shade to warm your skin up even more
- Olive Skin – warm tones, such as a warm peach, rose or even a bronze, will assist you to complement saving money undertones in olive skin
- Dark Skin – go for a highly pigmented shade, like a deep raisin, a tangerine or a terracotta
Step 9: Setting Everything in Place
It goes without saying that you will want all of your hard work to remain in your face provided possible, preferably before you choose to take it off yourself.
While the primer that you simply applied right in the beginning in Step one will be this from beneath, an environment product will really lock all things in place from above once you are done.
What sort of setting product the use of?
That all depends around the formulas of the products that you've already used.
If you have highlighted and contoured using powdered products, then you would be best off having a setting spray as opposed to a powder. You will only have to spritz this on your face a couple of times for this to fully work.
Alternatively, for those who have opted for cream or liquid formulas, then a setting powder may be good for you. An environment spray would still work, but a translucent finishing powder would help to lessen the shine that liquid formulas can often bid farewell to.
Even if you have never contoured and highlighted the face before, it isn’t going to take you lengthy to understand those six steps. Once you do, after that you can look into some of the more advanced techniques available that will help you take your highlighting and contouring game to the next level!

